Close-up photography is now a lot more powerful and exciting than ever before. That's because recent advances in digital photography now make it possible to produce close-up photographs that have both high resolution and large depth of field.
Depth of field has always been a big problem when photographing small things. Stopping down the lens gives more depth of field, but only to a certain point. Stopping down too much just makes the entire image fuzzy because of diffraction effects. When photographing something the size of a entire housefly, the optimum point is typically f/8 or wider, and the useful depth of field ("depth of detail") for a single picture is often 0.1 mm or less. The problem becomes more severe with greater magnifications.
So, when using traditional photographic techniques, the challenge has always been “to determine the optimum lens aperture for effecting the golden mean between stopping down the lens for depth of field and opening it up for good resolution.”[1]
Recent advances in digital photography greatly relax this tradeoff between resolution and depth of field.
The concept is simple. Instead of shooting one picture with a carefully chosen focus plane, you shoot a “stack” of multiple pictures, sweeping the focus plane through every place where you want to see detail. Some sophisticated but easy to use software then processes the stack, picking out the in-focus portions and combining them into a single picture that has both high resolution and large depth of field.
This "focus stacking" technique is effective over a wide range of applications. If you are happy with your current resolution, and you just want some more depth of field, then you may want to use short stacks, say 2-10 frames. Or if you want to push the technology, it's quite practical using current computers and cameras to stack 100 or more different focus planes. This allows opening up your lens to achieve optimum resolution, while still getting enough depth of field to cover your entire subject. The result can look remarkably like a scanning electron micrograph, but in true color.
The main limitation is that your subject cannot move while the image stack is being shot.
The photographs in Figures 1-5 (above and below) illustrate a fairly wide range of what can be accomplished.
There are currently three software packages that are free or
inexpensive and are fairly easy to use. My current favorite is a new
product, Zerene Stacker (http://zerenesystems.com/stacker).
It
produces high quality output for a wide range of subjects, and it
does
particularly well with spiny and hairy subjects that give problems for
other packages. It also provides a unique capability to produce 3-D
stereo/rocking output, using a stack shot from a single
viewpoint. Zerene Stacker is a commercial product with a variety
of pricing options and a free evaluation period. CombineZP (http://www.hadleyweb.pwp.blueyonder.co.uk/CZP/News.htm)
is
free and can be used without restrictions. Helicon
Focus (http://www.heliconsoft.com/)
is
a commercial product with a variety of pricing options and a free
evaluation period.
To do this kind of photography, you will need the following items:
The easiest way to get started is to use whatever close-up arrangement you are comfortable with. Set up your macro lens as usual, using a small aperture to maximize depth of field in each frame. Shoot a short stack, say 5 frames, stepping the focus plane by roughly the depth of field in a single frame. Then download and run the software, using the “Align & Stack All (PMax)” command if you have chosen Zerene Stacker. See that your depth of field has been multiplied by the number of frames, and be encouraged to continue.
It is easier to get good results if you can adjust focus in uniform steps. My favorite method is to use a screw-driven X-Y positioning table and vise sold for machining.[2] This device allows precision positioning calibrated down to 0.001 inch, is useful for even smaller increments, and its massive construction minimizes problems with vibration. (See Figure 6.) Other good alternatives include tic marks on the focus ring of a macro lens, using a macro focusing rail, mounting the subject on the vernier stage of a microscope, or using the built-in focusing mechanism of a microscope, either shooting through the microscope or attaching an extension to its stage to hold the subject for external lenses.
After you are comfortable with short stacks, you may want to try more aggressive techniques using wider apertures and deeper stacks to achieve higher resolution. I find that the following process works well:
You may also find the following hints helpful.
Lighting matters. Always position and illuminate your subject to highlight the features that you care about. This topic is discussed at length and beautifully illustrated in the now out-of-print Kodak Publication N-12, Close-up Photography and Photomacrography. Fortunately, copies of this publication are still commonly available through used booksellers.
Flash illumination minimizes the effect of equipment vibration, which otherwise can cause image blurring especially at higher magnifications. However, flash can also introduce undesirable brightness variation from frame to frame. Continuous illumination works well if your equipment is stable. If your camera can tolerate long exposures, ordinary flood lamps may be completely adequate to produce good work. All of the photos in this article were produced with the lighting setup shown in Figure 6, using a Canon 300D Digital Rebel camera.
With most stacking programs,
the most serious problems are caused by overlapping detail in the
subject. Where part of the subject passes in front
of another part, software often has difficulty deciding exactly
which features should be shown. There are two common problems: 1)
blurring
around sharp transitions in depth, and 2) "halo". Halo results
when
strong contrast occurs between the subject and any unfocused
background. It results from the software detecting the edge of
the blur circle in unfocused frames, and incorrectly treating it as
detail to be preserved. Halo is most obvious with black
backgrounds. It can be minimized by using a less contrasting
background color, by using a slightly textured background, by shooting
frames close enough together, and by
changing certain processing parameters. (The parameters are
different for each program.) One big reason I recommend starting
with the "Align & Stack All (PMax)" method in Zerene Stacker is
that
it's very resistant to both blurring and halo.
Finally, be cautious
about JPEG image compression. Stacks that have been
compressed too far can make the software detect “detail” where in fact
there was none, causing mistakes in choosing which pixels to put in the
final image. What works depends on your camera,
subject, and how you use the software, so you’ll have to experiment to
see what you can get away with. When in doubt, set
your camera to produce the highest quality images that you can afford
to store and process.
Extended depth of field digital photography -- "focus stacking" -- opens a wide range of possibilities that were previously unavailable because of basic limitations of optics. The processing described in this article, while conceptually straightforward, has become broadly usable only during the last few months (as of Summer 2005) due to simultaneous improvements in computing speed, memory and storage capacity, digital camera technology, and software development. Other complementary techniques are also being developed, such as wavefront coding[3] that promise further significant improvements in the long term. These are exciting times!
Thanks are due to Dr. David James, WSU, for providing some of the livestock used for illustration; to Dr. James, Alan Hadley, Dave Nunnallee, John Hollenberg, and David Sykes for valuable discussions; and of course to all the developers of this great technology.
Figure 2. Side-by-side comparison of the extended depth-of-field image produced by Zerene Stacker and one of original frames from the stack of 48.
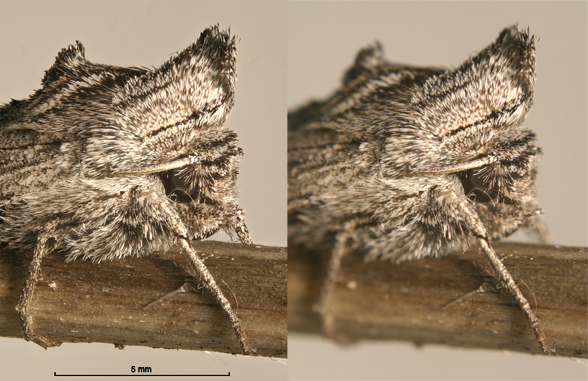
Figure 3 (below). Erynnis propertius larva, final instar. Assembled by Zerene Stacker from 6 frames, just enough to render the entire head capsule in focus at f/8, the aperture producing highest resolution at this magnification.
.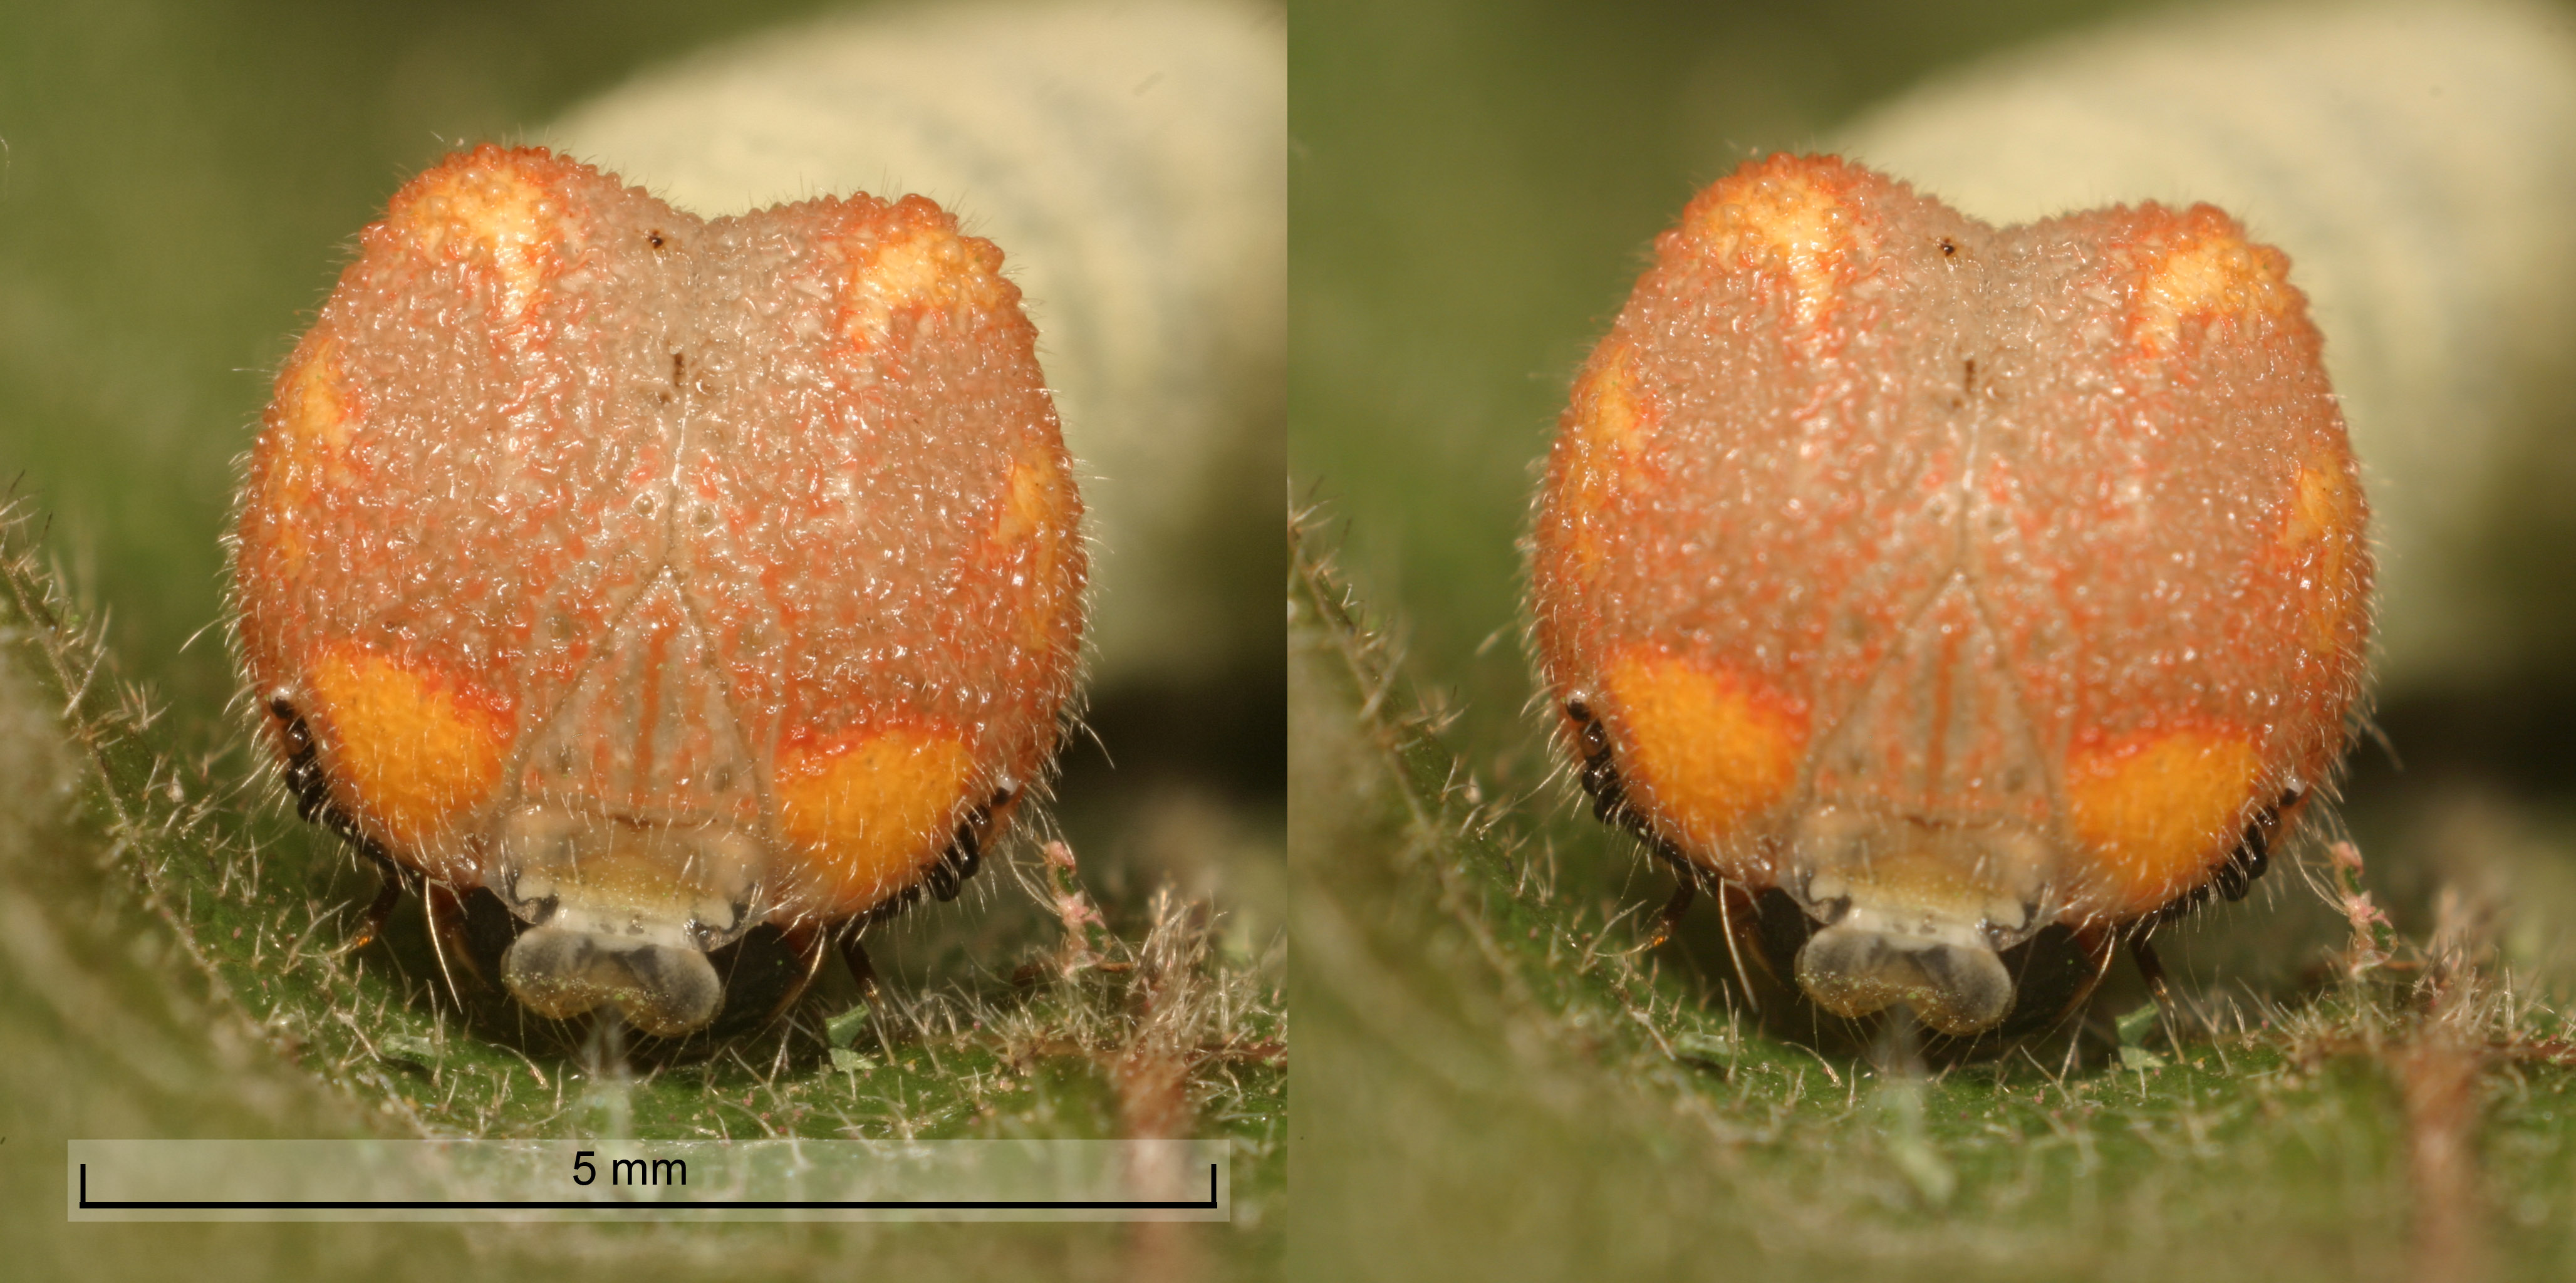
Figure 4 (below). Icaricia lupini egg,
processed by Zerene Stacker
from
a 59-frame stack. Shot with a 10X, 0.25 N.A.
microscope objective on 240 mm tube. Representative
single frame shown at right. For additional information, see
http://www.janrik.net/insects/ExtendedDOF/lupiniEggStereo.html.
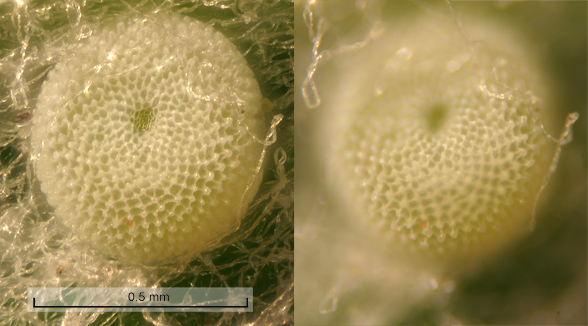
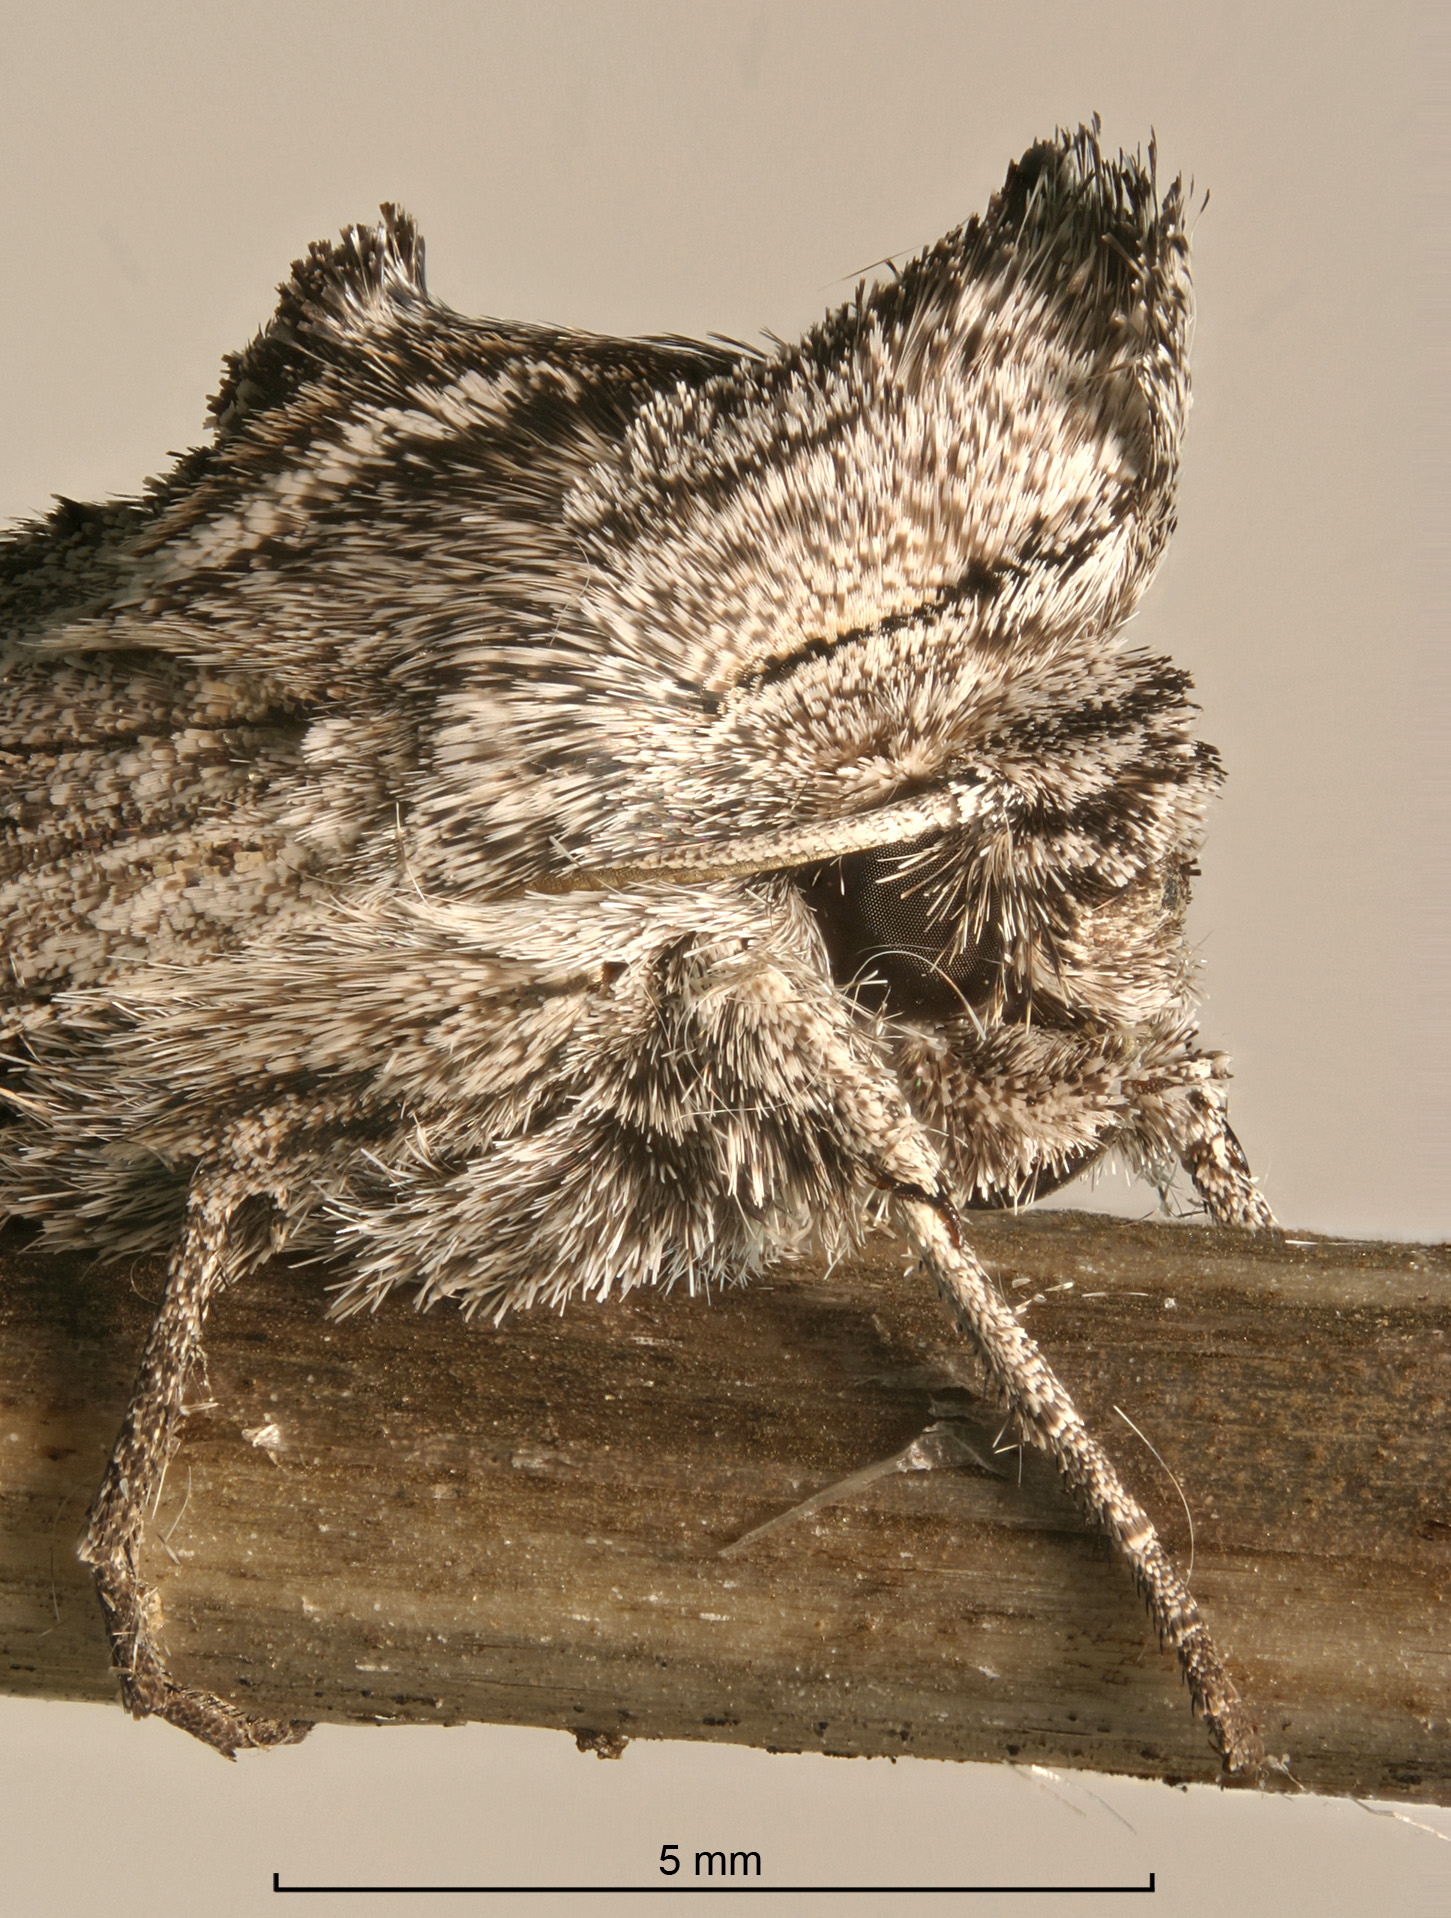
Figure 5 (below). Labial palp and eye of Painted Lady butterfly (Vanessa cardui). 92 frames stepped by 0.001 inch. Overall size 3x2x2.3 mm (width x height x depth). Prior to Zerene Stacker, the many overlapping hairs of this specimen were troublesome and required special treatment as described at http://www.janrik.net/insects/ExtendedDOF/DifficultTestCase.html. The image shown here was straightforward to produce using Zerene Stacker "Align & Stack All (PMax)".
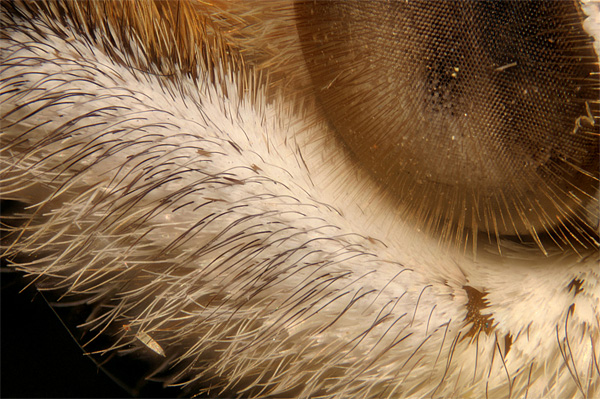
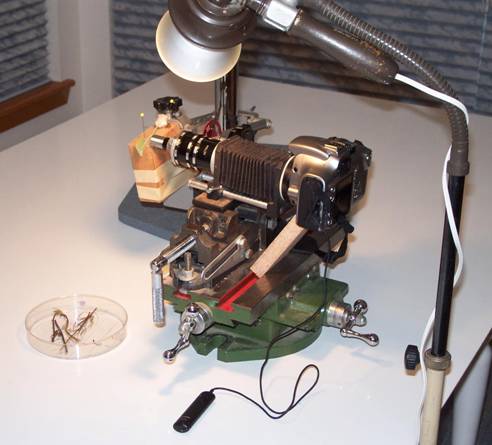
Figure 6 (below). The setup used for all
photographs
in this article. The
heavy screw-driven X-Y table provides both precise positioning and
excellent resistance to vibration, with an extra cross-brace added to
support the camera. llumination is provided by a
conventional floodlamp plus fill-in
lighting (not shown). The subject being
photographed is the Icaricia lupini egg shown in Figure
4.
.
[1] Close-up Photography & Photomacrography, Kodak Publication N-12, 1977, pg. 78.
[2] Mill table and vise, e.g. Enco Model #201-2826 and #426-8080, www.use-enco.com.
[3]
Wavefront coding keeps a focus on applications, http://optics.org/cws/article/articles/18342